常见小贴士
常见小贴士
Serverless Devs 和 fc3 组件的关系
-
Serverless Devs 是一个无厂商锁定 Serverless 的工具框架,本身不具任何能力,用户可以通过引入不同的组件使用不同的功能
-
而 fc3 组件则是这个工具框架的一个组件,主要是对阿里云函数计算进行操作的,例如创建函数,删除函数、发布版本、业务构建、在线调试等;
如果需要进行比喻:
- Serverless Devs 是小时候玩的红白机,而 fc3 组件等都是游戏卡,游戏机本身不具备啥功能,根据我们插入的游戏卡实现不同的功能;
- Serverless Devs 就相当于我们用的 VSCode 工具,本身不具备太多的能力,但是我们可以安装不同的插件,来丰富 VSCode 的能力,而这些插件对应到 Serverless Devs 生态中,就是不同的组件,例如 fc3 组件,fc3-domain 组件,ros 组件等;
Serverless Devs 的 Yaml 模式 Cli 模式指的是什么
Serverless Devs 开发者工具从根本上提供了两种使用方法。
- Yaml模式:需要依赖资源描述文档进行操作的模式
- Cli模式:可以在任何目录下直接执行,而不需要依赖资源描述文档;
这两者的核心区别是:
- 如果想要使用 Yaml 模式,在当前目录下,必须要有
s.yaml/s.yml文件,或通过-t/--template指定的资源部描述文件; - 如果想要试用 Cli 模式,则必须是
s cli 组件名 方法 参数的格式进行,此时不需要 Yaml 文件;
更多详情请参考Yaml 模式 Cli 模式对比
如何声明/部署多个函数
edition: 3.0.0name: hello-world-appaccess: "default"
resources:  hello_world_1:    component: fc3    props:      region: cn-huhehaote      functionName: "func1"      description: 'hello world by serverless devs'      runtime: "nodejs14"      code: ./code1      handler: index.handler      timeout: 30  hello_world_2:    component: fc3    props:      region: cn-huhehaote      functionName: "func2"      description: 'hello world by serverless devs'      runtime: "nodejs16"      code: ./code2      handler: index.handler      timeout: 30
其中 hello_world_1 和 hello_world_2 表示两个函数, hello_world_1 和 hello_world_2 表示 s.yaml 中虚拟资源定位符,在整个 s.yaml 中全局唯一即可,您可以:
- s deploy : 部署两个函数
- s hello_world_1 deploy : 只部署 func1 函数
- s hello_world_2 deploy : 只部署 func2 函数
如何配置函数的自定义域名
edition: 3.0.0name: hello-world-appaccess: "default"
vars: # 全局变量  region: "cn-hangzhou"
resources:  hello_world:    component: fc3    props:      region: ${vars.region}      functionName: test      description: 'hello world by serverless devs'      runtime: nodejs16      code: ./code      handler: index.handler      memorySize: 128      timeout: 30
  test-fc-domain:    component: fc3-domain    props: #  组件的属性值      region: ${vars.region}      domainName: auto # 使用 auto 自动获取一个临时测试域名, 生产请务必使用自己的域名      protocol: HTTP  # HTTP | HTTPS | HTTP,HTTPS      routeConfig:        routes:          - functionName: ${resources.hello_world.props.functionName}            methods:              - GET              - POST            path: /a            qualifier: LATEST
您可以通过如下命令快速开启一个函数计算自定义域名示例:
s init start-fc3-custom-domain -d start-fc3-custom-domain
有关 fc3-domain 组件请参考 fc3-domain
如何解决Yaml配置重复冗余的问题
edition: 3.0.0name: hello-world-appaccess: "quanxi"
template:  template1:    region: cn-huhehaote    vpcConfig:      securityGroupId: sg-hp35rch85iufe6hwp17b      vSwitchIds:        - vsw-hp3k80wi9vrx8fgtgccn1      vpcId:           vpc-hp3o04j4bth03op3arft8
    runtime: nodejs16    handler: index.handler    timeout: 30
resources:  hello_world_1:    component: fc3    extend:      name: template1    props:      functionName: "test-func1"      description: 'hello world 1 by serverless devs'      code: ./code
  hello_world_2:    component: fc3    extend:      name: template1    props:      functionName: "test-func2"      description: 'hello world 2 by serverless devs'      code: ./code2
更多请参考 extend template 和 yaml 继承 完成配置冗余的问题
如何实现函数多 region 部署
shell 脚本
#! /bin/bashregions=("cn-hangzhou" "ap-southeast-1")for r in ${regions[@]}do export REGION=$r s deploy -ydones.yaml 示例
edition: 3.0.0name: hello-world-appaccess: 'default'resources: hello_world: component: fc3 props: region: ${env('REGION')} functionName: 'start-nodejs-im1g' description: 'hello world by serverless devs' runtime: 'nodejs14' code: ./code handler: index.handler memorySize: 128 timeout: 30如何快速克隆一个函数的代码和配置
可以使用 s 工具的 sync 指令快速完成函数的代码和配置同步到本地, 然后修改 s.yaml 中的 region 或者函数名字, 然后执行 s deploy 实现函数的克隆。
函数计算2.0 也可以使用 sync 指令
智能提示和检测
给VSCode插件做智能提示和检测, 详情参考intelligent
关于.fcignore使用方法
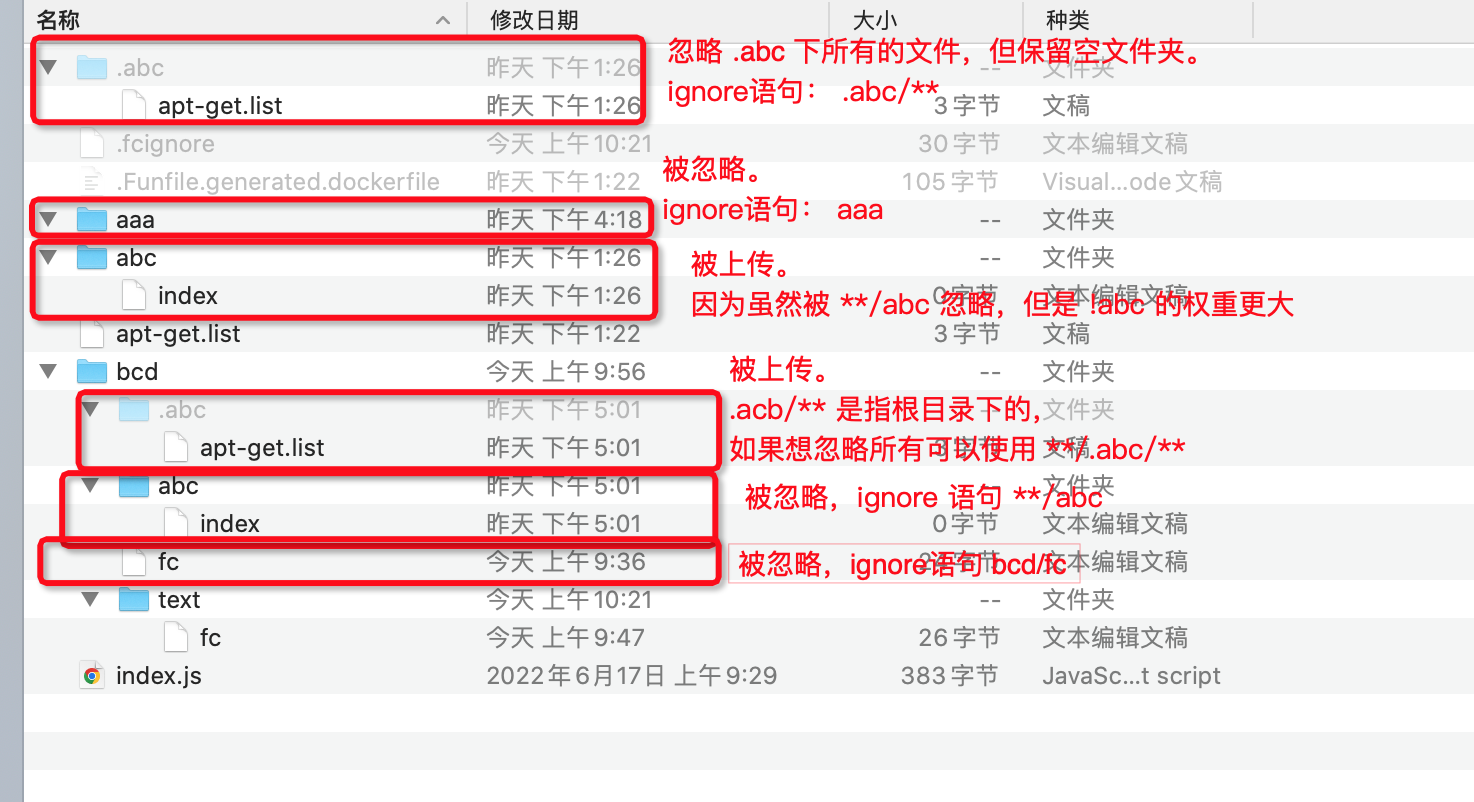
.fcignore 的内容如下:
aaa**/abc!abc.abc/**bcd/fc文件解读:
aaa:忽略根目录的 aaa 的文件夹或文件
**/abc:忽略所有 abc 的文件夹或者文件
!abc:不忽略根目录下的 abc 文件夹或者文件
.abc/**:忽略根目录下 .abc 的所有内容,但 .abc 的空文件夹不被忽略
bcd/fc:忽略根目录 bcd 下 fc 的文件夹或者文件
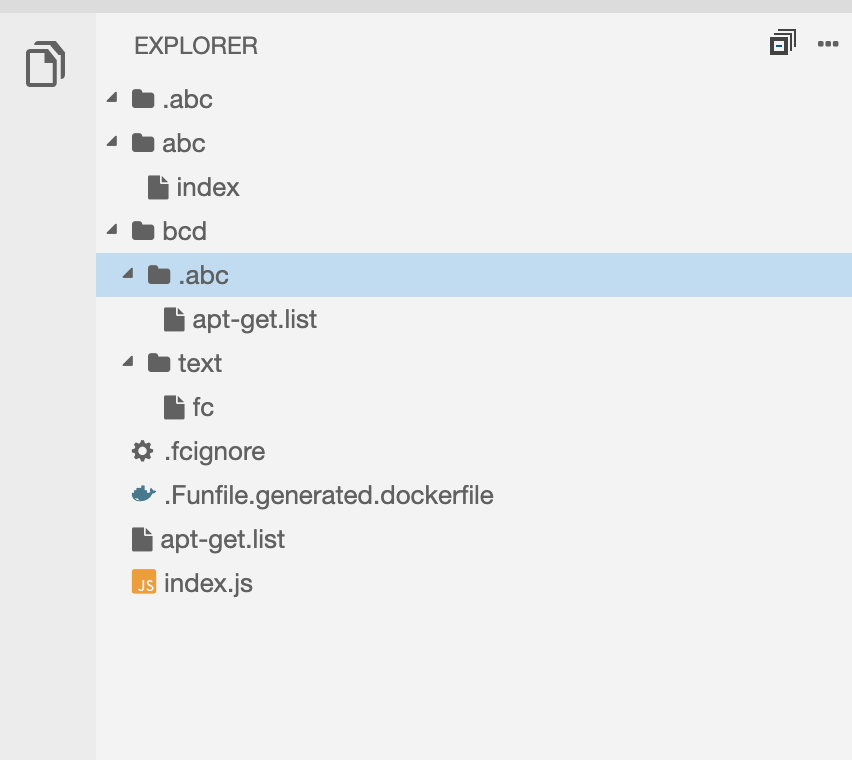
解析预期结果

deploy 到线上的目录结构

关于.env使用方法
项目代码中涉及到数据库的连接信息,云账号的AccessKeyID, AccessKeySecret等敏感信息,禁止写死在代码中,提交到 git 仓库。否则会造成严重的安全风险。
Step1. 假设我的.env 文件如下
AccessKeyID=xxxxAccessKeySecret=xxxxxxx注意:务必在
.gitignore中忽略.env文件
Step2. 配置文件(s.yaml)可以将.env中变量作为环境变量传递到 FC 执行环境中:
edition: 3.0.0name: fc3DeployAppaccess: default
resources:  test-function:    component: fc3    props:      region: cn-hangzhou      functionName: test      runtime: nodejs16      code: ./code      handler: index.handler      environmentVariables:        AccessKeyID: ${env('AccessKeyID')}        AccessKeySecret: ${env('AccessKeySecret')}
Step3. 在项目代码中读取环境变量
- 本地测试可以通过类似dotenv库来读取
.env环境变量 - 在 FC 环境线上执行时候,会将环境变量直接注入到当前进程,NodeJS 应用可以通过
process.env.AccessKeyID直接获取环境变量。
Yaml 是否支持全局变量/环境变量/引用外部文件
Serverless Devs 的 Yaml 规范本身支持全局变量、环境变量以及外部内容的引入:
- 获取当前机器中的环境变量:
${env('环境变量')},例如${env('secretId')} - 获取外部文档的变量:
${file('路径')},例如${file('./path')} - 获取全局变量:
${vars.*} - 获取其他项目的变量:
${projectName.props.*} - 获取 Yaml 中其他项目的结果变量:
${resources.projectName.output.*} - 获取当前配置的 config 变量:
${config('AccountID')}本质是获取s config get中变量值 - 获取当前模块的信息:
${this.xx}, 比如${this.props.name}
详情可以参考:Serverless Devs Yaml 规范文档
如何实现函数代码包上传走内网更新部署
如果执行 s 命令的机器(比如ECS)是和和函数在相同的区域,比如是 cn-shenzhen, 那么可以通过 export FC_REGION=cn-shenzhen && s deploy -y, 这样上传代码包去更新函数,会使用 oss 内网。
对于 FC2.0 的函数, 还需要加上 export FC_DEPLOY_CODE_USE_OSS_CONFIG=true。
如何基于Podman,使用Serverless Devs工具进行构建与本地调试?
使用 Serverless Devs 工具执行构建或本地调试函数时,如果没有安装 docker, 而是基于 Podman 工具,会提示报错 Failed to start docker, xxx,此时,您可以创建一个Docker目录软链接指向Podman的目录,然后再执行构建或本地调试。创建软链接的具体操作如下所示。
1. 查询Podman可执行文件路径
which podman本文示例中Podman可执行文件路径为 /usr/bin/podman。
2. 设置软链接
ln -s /usr/bin/podman /usr/bin/docker3. 查询软链接是否已生效
ls -lh /usr/bin/docker预期输出如下:
lrwxrwxrwx 1 root root 15 Jan 5 09:30 /usr/bin/docker -> /usr/bin/podmanYaml 特殊变量
在 Serverless-Devs 中有些特殊变量有特定的用途,开发者没有特殊的需求,避免使用特殊变量
${aliyun-cli}作用在access的值中,从获取aliyun cli的默认的profile,并且生效。
执行
aliyun configure list可以查看当前生效的profile
项目实践案例
fc2.0 的 fc 组件和 fc3.0 的 fc3 组件关系是什么?
详情请参考 fc组件(旧版/fc2.0)
使用指令卡死了,无法退出,要怎么办?
问题的原因是之前曾经用管理员权限执行过,导致~/.s目录下部分文件的权限被修改为管理员权限,导致错误。
解决方式:删除~/.s目录,然后重新执行指令。
如非必要,请不要使用管理员权限安装或启动 Serverless Devs。
